

Are you a dental professional looking for a way to achieve the perfect, polished finish for your crowns, dentures, and restorations? If so, a high-quality dental polishing set is essential for ensuring that your dental work looks flawless and lifelike.
The article below will guide you on how to use a dental polishing set for polishing after dentures and restorations. Achieving professional-quality results requires the right tools and techniques, and using a dental polishing set along with the appropriate dental polishing paste will help you achieve a smooth, glossy finish on your restorations.
Let’s get started and learn how to use a dental polishing set and dental polishing paste to give patients a natural-looking, radiant smile.
Introduction and Importance of a Dental Polishing Set:
In many restorative and cosmetic procedures, dental polishing is the final step to ensure a shiny and smooth surface. A dental polishing set is a collection of dental polishing tools for teeth whitening that are used to polish and smooth the surface of dental restorations.
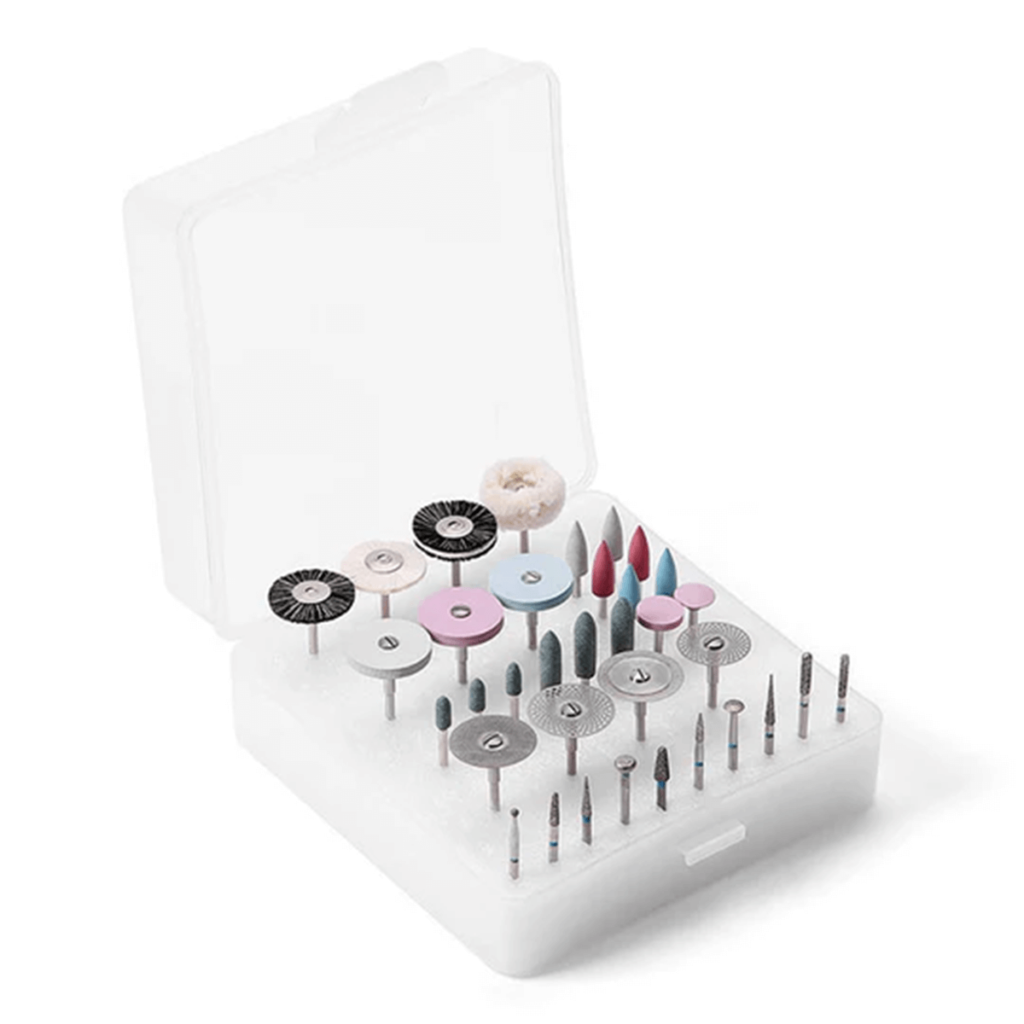
A dental Grinding and Polishing Set contains instruments like abrasive discs, dental polishing paste, rotary tools, rubber points, and felt disc or brush. Proper polishing improves the durability of restorations, prevents staining, and removes plaque buildup. The dental polishing tools for teeth whitening are designed to give you a visually pleasing and bright smile with your dental restorations. Aidite is one of the top manufacturers of dental tools, offering the best quality and long-lasting durability.
Benefits of Using a Dental Polishing Set:
A dental polishing set is necessary to make the surface of restorations smooth and shiny. It improves functionality, aesthetics, durability, and oral health without any discomfort for the patient. Some of the key benefits of using a dental Grinding and Polishing Set are listed below.
- Gives a polished and natural look
- Creates strain-free and glossy surface
- Removes plaque and accumulation of bacteria
- Smooths rough and sharp edges
- Prevents staining, chipping, and wear of dental restorations
- Provides optimal chewing efficiency and smooth occlusion
- Improves patient satisfaction
- Reduces the need for frequent adjustment of dental polishing set
How to Use a Dental Polishing Set for a Brighter Smile:
The process of using a dental polishing set involves the process of removing stains, smoothing imperfections, and giving your teeth a shiny polished finish. The process of how to use a dental polishing set is described below for your easy consideration.
Step 1: Checking And Correcting the Shape of the Tooth
The shape of teeth is crucial for integration and symmetrical proportion of the restoration with other teeth. In this step, you have to observe the angle lines to create an illusion between short, long, narrow, and wider teeth. If you need a wider illusion move away from the angle lines and if you need a narrower illusion decrease the flat area and approach the angle lines. Once, the shape is checked and corrected, you can move on to the next step.
Step 2: Doing Contour of Incisal Embrasure
The triangular space between two or more adjacent teeth is called incisal embrasure. The contour can be straight or curved and usually, the mesial angle is less rounded than the distal angle. A more rounded incisal embrasure gives a bright and feminine smile to your patient. This step often requires precision, which can be achieved with the right dental polishing tools.
Step 3: Making the Outline of The Embrasure
An abrasive disk is used to make the outline of the embrasure, and these dental polishing tools are available in 4 different sizes with a specific color. The intermediate grains i.e. light orange and dark orange are commonly used in the finishing process. The reason behind this is these two discs remove less composite and add more brightness to the resin as compared to the others.
Step 4: Verification and Rectification of Vestibular
The part of the tooth that faces the mouth vestibule (space between cheeks, lips, and two of the rows) is called the vestibular surface. It is necessary to verify the vestibular contour of the restoration for transition and inclination between the incisal third, middle third, and cervical third. Medium or fine-grain diamond drills are the common dental polishing tools for teeth whitening that can be used for this purpose.
Step 5: Interproximal Polishing of Adjacent teeth
Interproximal polishing is the procedure of re-contouring and polishing the surface between adjacent teeth to improve tissue health and contact. You can use different dental polishing tools for teeth whitening including sandpaper strips or metal polishing strips for this purpose. These stripes are available in abrasive i.e. Edenta, Intensive, Coltene, and GC.

Step 6:- Polishing the Surface with Rubber Disk
After the correction of contour and shape of restoration, it is mandatory to smoothen the entire surface of the resin with a dental polishing set. If you want to recreate a textured tooth, you can further move on the macro texture after smoothing the surface. But if you are not going to recreate, you can skip the micro and macro texture step.
Step 7: Creating Macro Texture
The macro texture is further divided into two groups, i.e. horizontal macro texture and vertical macro texture. The extent of the upper incisors is called vertical grooves, and it shows the relief made by mesial, distal, and central lobes. The vertical grooves open out into the incisal and narrow down at the cervical. The low-rotation fine drill from dental polishing tools is used for both horizontal and vertical macro texture. The other type of texture is a horizontal macro texture that contains 2 or 3 smooth horizontal grooves between angle lines and t is more evident with the middle and cervical third of the tooth.
Step 8: Creating Micro Texture
The micro-texture is done after the macro texture and is also divided into two further groups, i.e. vertical and horizontal micro grooves. The vertical micro-texture contains small vertical grooves in the center of vertical macro grooves. The horizontal micro-texture contains horizontal thin lines starting from the incisal and ending at the cervical of the vestibular surface.
Usually, these lines are called perikymata and are extremely thin and close to each other. The thin diamond tips from the dental polishing tools are used in this process. Don’t forget to use the diamond tip with gentle pressure, maintaining an angle of 45 degrees.
Step 9: Smoothing the Surface with Rubbers:
It is important to smooth the depressions of the surface caused during drilling on the composite resin. There are different types of rubbers available in a dental polishing set to smooth the resin. Manufacturers like Astropol and Ivoclar offer polishing rubbers with different granulations. You can utilize these granulations during the polishing procedure starting with high abrasive and ending with low abrasive rubber.
When moving the rubbers on the surface, run the rubbers through horizontal and vertical lines to give the surface a smooth and shiny appearance.
Step 10: Use of Dental Polishing Paste
There are many types of dental polishing paste available including diamond paste, aluminum oxide paste, fluoride infused paste, and silicone-based paste. The low-grade diamond or aluminum oxide dental polishing paste is highly recommended for the natural and shiny look of the surface. You can use a soft brush or felt disc to apply the dental polishing paste on the surface of the resin.
When using a disc, the maximum pressure should not increase to 5000 rpm while applying a dental polishing paste. Also, the use of water during the procedure is not mandatory, only use water to cool down the teeth between each step.
Necessary Dental Polishing Tools for Teeth Whitening:
A dental polishing set plays an important role in eliminating surface stains and enhancing tooth brightness. Some basic dental polishing tools for teeth whitening are shortly described below for your understanding.
1. Rotary Handpiece:
The rotary tool is a motorized device for removing stains and smoothing the surface. It is used to clean the surface of a tooth and can be operated at various speeds. You can target any specific area with this dental polishing tool and remove or smooth the surface for a shiny look.
2. Rubber Polishing Points:
The rubber points dental polishing tools for teeth whitening are used to clean, polish, smoothen, and finish various dental surfaces. These are used with rotary handpieces, and the flexibility of rubber enables the dentist to effectively polish hard-to-reach areas without any damage.
3. Abrasive Discs:
An abrasive disk is attached to the handpiece and used to lightly grind the outer layer of the tooth. It is the best dental polishing tool to remove imperfections, flatten and grind the surface, and give it a uniform shiny effect.
4. Dental Polishing Paste:
The dental polishing paste is used to embed fine abrasive particles into the surface and buff the discolored area. The dental polishing paste is applied with the help brush or felt disc to prevent enamel from stain and give it shine.
5. Felt Disc and Brushes:
These dental whitening tools are used for applying the dental polishing paste on the surface. The surface spin of the disc or brush ensures an even distribution of dental polishing paste on the surface. This tool from the dental polishing set ensures equal polishing and optimal color on the surface of the restoration.
FAQs:
1. For what dental polishing sets are used?
A dental polishing set is used for refining, smoothing, and polishing dental restoration to give them a glossy and natural finish.
2. What are the most common dental polishing tools for teeth whitening?
The common dental polishing tools for teeth whitening are rotary handpieces, abrasive discs, felt discs, polishing rubbers, and dental polishing paste.
3. What are the different types of dental polishing paste?
There are different types of dental polishing paste available to get the desired outcome. Some of these are silicone base paste, diamond paste, aluminum oxide paste, and fluoride-infused dental polishing paste.
4. What is the recommended duration for tooth polishing?
Typically, it is recommended after every six months for the best shine and dental health.
Conclusion:
A dental polishing set is the basic tool for all dental professionals. It is used to smooth and polish dental restorations for a natural and shiny look. Dental polishing tools like rotary handpieces, abrasive discs, felt discs, polishing rubbers, and dental polishing paste are basic tools to give you a brighter smile. You can utilize these dental polishing tools for teeth whitening and oral hygiene.
Follow the above step-by-step procedure for using a dental Grinding and Polishing Set and dental polishing paste to get the desired results for your patients. Aidite is the best supplier of dental tools and other equipment for professionals. These tools are highly durable and effective for getting the best results. You can buy the latest tools and equipment with blind trust from them.