


Inappropriate usage of dental loupes causes neck pain, eye tiredness, and back pain among dentists. If the loupe is not set right, it makes you bend your head too much. This can hurt your neck and back. Some loupes may also be too heavy or too tight, making your nose and ears sore after a long day.
This can also affect the quality of your work. Over time, this can slow you down and lower your work results. To get rid of all these problems, it’s important to understand the right method of adjusting and using the dental loupe.
In this article, you will explore a step-by-step guide on how to use dental loupes. At the end, a small section that provides tips for how to clean dental loupes.

Before moving to the method of using loupes, let’s explore the process of adjusting for good performance.
How to Adjust Dental Loupes for Optimal Performance?
It’s important for you to use the best way to use dental loupes to avoid any errors or complications. If your loupes don’t sit right, you may feel pain or see blurry details. Good adjustment helps you work better and feel less tired. Below are the main steps of how to adjust dental loupes.
Step 1: Set the Working Distance
The first step is to adjust the space from your eyes to the patient’s mouth. It should match your sitting or standing position. Sit as you normally work and hold a ruler or measuring tape from your eyes to the work spot. Use that length to adjust your loupes.

Step 2: Adjust the Interpupillary Distance (IPD)
The next step is to adjust the space between your two pupils. The lenses in your loupes must match this space. If not, your eyes may strain, or you may see double. You can do it by putting the loupes on and looking at a point ahead. Adjust the barrels until both sides line up into one clear circle.

Step 3: Set the Declination Angle
This is a very important step in loupe adjustment. A good angle lets you see clearly without bending your neck too far. For doing this, you should sit straight and lower the loupe barrels until they aim at your normal work zone. This keeps your neck straight and avoids long-term pain.
Step 4: Fit the Frame to Your Face
Then fit the loupe frame. The loupes must sit well on your nose and ears. If they slide or press too hard, you’ll feel it all day. Use the nose pads and earpieces to adjust the fit. Some loupes come with bendable arms or soft grips. Make sure they sit flat and firm but not too tight.

Step 5: Align the Light Source
If your loupe has an LED light, then adjust the light source for maximum brightness. The light beam should land where your eyes look. First, turn it on and face your work spot. Adjust the light head until it points in the center of your field. A well-placed light helps you work faster and spot small cracks or marks clearly.
Step-by-Step Guide: How to Use Dental Loupes Properly?
Once your loupe is adjusted, the next move is to use it in the correct way. A single wrong move can ruin your whole treatment plan and damage your clientele. Here is a step-by-step guide on how to use the dental loupe properly.
Step 1 – Position the Patient and Yourself Correctly
First of all, start by seating your patient comfortably. Adjust the dental chair so that the oral cavity is at your eye level. You should be sitting upright, with your shoulders relaxed. Your thighs should be parallel to the ground. Keep your back straight and avoid leaning forward.

Step 2 – Put On Your Loupes and Adjust the View
Once you position your patient, put on your dental loupes. Look straight through the lenses and align your head. You can start by focusing on the front teeth. If the view is blurry, move your head slightly up or down to find the sharpest image. Make sure the optical center of the loupes lines up with your pupils.

Step 3 – Use Your Mirror to Guide the View
Once your direct view is sharp, grab your dental mirror. Use it to reflect light and visibility into hard-to-reach spots. You can hold the mirror steady while keeping your head in a comfortable position. It extends your view while enabling you to stay upright. This combo keeps your neck healthy and your vision sharp.

Step 4 – Check Gums, Enamel, and Restorations Closely
Now it’s time to inspect the patient’s mouth. You can move from tooth to tooth by starting at the upper right quadrant. Use your loupe to scan each surface and look closely at the enamel for cracks. Pause at crowns, implants, or suspicious spots and examine them thoroughly. It helps you detect early signs of problems.
Step 5 – Perform Procedures With Consistent Focus
When you inspect your patient’s mouth, keep your head still and your eyes locked through the lenses. Your hands should follow what your eyes see. This step is about building muscle memory. The more you use your loupes properly, the more natural it feels. Over time, your hands, eyes, and posture all sync up. That leads to smoother procedures and better outcomes.
How to Clean Dental Loupes Safely and Effectively
After reading the step-by-step guide to using dental loupes, it’s time to clean the loupe thoroughly. Cleaning saves your loupe from breakage or scratching the lenses. Here is a step-by-step guide on how to clean dental loupes.
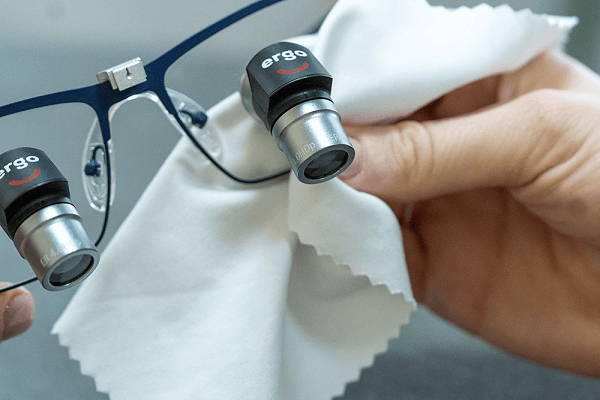
Step 1 – Use Recommended Cleaning Products
Lenses are the sensitive part of the dental loupe. Always choose products made just for lenses. Use approved lens wipes or sprays from trusted dental brands. Microfiber cloths are soft and best for cleaning the lenses and the loupe frame. You can also use anti-fog sprays if your loupes fog up during long procedures.
Step 2 – Start With a Daily Cleaning Routine
Before or after each day, wipe your lenses with a soft cloth. Spray a small amount of lens cleaner. Then gently clean the front and back of each loupe. Also, clean the frame and nose pads with a damp cloth. This keeps sweat, dust, and bacteria away.
Step 3 – Follow a Deep Cleaning Schedule Weekly
Once a week, do a full cleaning of the dental loupe. Take your time and start by blowing off dust with a soft air blower. Next, wipe with a lens-safe spray and cloth. Then clean the hinges, arms, and straps. If your loupe has LED lights, clean around the light with a cotton swab.
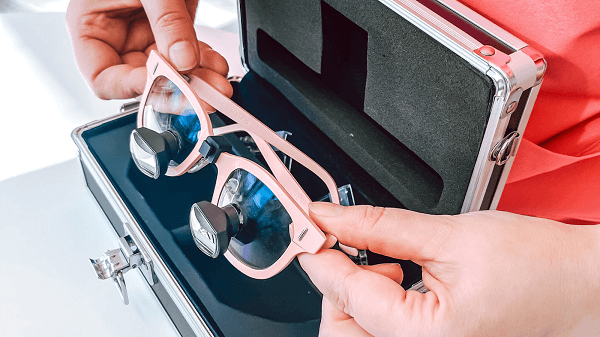
Step 4 – Store and Handle With Care
Once your dental loupes are clean, handle them with dry hands. Store them in their case when you’re done. Avoid laying them face down on tables. Use a hard case with padding. This protects the lens and frame if it gets dropped. Keeping your tools in good shape saves money and helps everyone work better.
FAQs
How do dental loupes work?
Dental loupes work like tiny telescopes for your eyes. They make small things in the mouth look bigger. This helps you see better and work with more detail. The lenses are set in front of your eyes and give a clear, zoomed-in view. Dentists use them to check teeth closely.
How to wear loupes?
To wear loupes, first place them gently on your nose like regular glasses. Make sure they sit straight and feel comfy. Adjust the straps so they don’t fall off. Check that the lenses line up with your eyes. You should see clearly without bending your neck too much.
What do dentists see through loupes?
Dentists see teeth, gums, and small spots more clearly through loupes. Loupes make tiny details look bigger. Dentists can spot cracks, cavities, and plaque better. They help dentists clean teeth and do fillings with more care.
Final Thoughts
To sum up, the steps of how to use dental loupes are simple and straightforward. When you follow the right way, you don’t have to bend your neck. This helps you avoid back pain, eye strain, and tired hands after long hours.
The above step-by-step guide to using dental loupes enables you to easily use them without any professional help. However, you should have a quality dental loupe before doing these steps. There are a lot of brands that provide cost-effective loupes, like Aidite. The Aidite ergo loupe is light, clear, and easy to use. They help you work better without breaking the bank.